The Battle of Ulundi, fought on July 4, 1879, stands as a pivotal moment in the history of the Anglo-Zulu War, marking the British Empire’s decisive victory over the Zulu Kingdom. This confrontation not only signified the end of major hostilities but also served to dismantle the military capabilities of the Zulu nation, culminating in the capture and destruction of their royal kraal at oNdini. The strategic maneuvers employed by the British forces, combined with the Zulu’s failed attempts at negotiation and military engagement, illuminate the complexities of colonial encounters during this period.
This article will explore the intricacies of the battle, detailing the events leading up to the confrontation, the tactical decisions made by both sides during the engagement, and the subsequent aftermath that reshaped the region. By examining the factors that contributed to the British victory, including their mobilization of resources and the Zulu’s response to British advances, a clearer understanding of this historic event will be established. The analysis will also reflect on the broader implications of the battle for both the Zulu people and the British Empire.
Overview of the Battle of Ulundi

Historical Context
The Battle of Ulundi, fought on July 4, 1879, represented a pivotal moment in the Anglo-Zulu War, marking the final confrontation between British colonial forces and the Zulu kingdom. This engagement was significant not only for its immediate military outcomes but also for its broader implications for British imperial policy in Southern Africa. Prior to this battle, the British had experienced severe losses against the Zulus, notably during the Battle of Isandlwana. The psychological and strategic repercussions of this defeat propelled British authorities to reconsolidate their military efforts, shift strategies, and eventually, to escalate their campaign against the Zulu. The context of imperial ambitions, coupled with existing tensions between the indigenous population and colonial authorities, set the stage for this critical encounter.
Significance of the Battle
The Battle of Ulundi was not merely a tactical engagement; it symbolized the end of Zulu sovereignty and the consolidation of British imperial control over Zululand. Following the defeat at Ulundi, the British forces succeeded in dismantling the central authority of the Zulu kingdom, capturing King Cetshwayo and instigating a shift in the political landscape of Southern Africa. The British anticipated that such victories would serve as examples to other indigenous groups resisting colonial rule. Consequently, the battle has been interpreted as a decisive turning point in the establishment of British hegemony in the region.
Timeline of Events
The events leading up to the Battle of Ulundi transpired over several crucial weeks:
- May 1879: Initial defeats of the British forces prompt a reassessment of strategy.
- June 3, 1879: The British forces commence their second invasion of Zululand.
- June 4, 1879: Zulu envoys deliver a message seeking terms for peace.
- June 28, 1879: British forces draw near to the Zulu capital, Ulundi.
- July 3, 1879: Reconnaissance operations provoke Zulu scouts, heightening tensions.
- July 4, 1879: The Battle of Ulundi commences, concluding with a decisive British victory.
Prelude to the Conflict
Background of the Anglo-Zulu War
The Anglo-Zulu War erupted against a backdrop of colonial expansionism and the Zulu nation’s efforts to assert its territorial integrity. The causes of the war could be traced to long-standing grievances regarding land disputes and British interference in Zulu governance. Following earlier skirmishes and a fluctuating balance of power, tensions escalated, leading to open conflict in early 1879. The war thus embodies the broader dynamics of colonial conquest and indigenous resistance.
Previous Engagements
Before the pivotal battle at Ulundi, a series of engagements had shaped the trajectory of the war. The British faced an unexpected and historically significant setback at Isandlwana, where they sustained heavy casualties. This defeat galvanized British resolve, leading to significant reinforcement and a return to a more aggressive military posture. The subsequent engagements clarified the need for strategic adjustments, culminating in the decision to confront the Zulus directly and decisively at Ulundi.
Reinforcements and British Strategy
In response to the defeat at Isandlwana, British military planners recognized the imperative to reinforce their forces and revise their operational strategies. The arrival of additional troops and artillery, including advanced weaponry such as Gatling guns, enabled the British to mount a concerted effort against the Zulu forces. Lord Chelmsford’s aim was to leverage numerical superiority and firepower to achieve a decisive victory that would reassert British dominance in the region and compensate for previous military failures.
The British Offensive

Lord Chelmsford’s Command
Lord Chelmsford, serving as the commander of British forces, approached the second invasion of Zululand with a blend of urgency and determination shaped by the earlier setbacks. Despite receiving orders from higher command to refrain from aggressive actions, Chelmsford opted to move forward, motivated by a desire to restore his reputation and demonstrate military efficacy. His leadership was marked by both tenacity and an inclination to disregard central commands.
Structure of the British Army
The British contingent assembled for the offensive towards Ulundi was substantial, comprising various branches of the military. The force included two cavalry regiments, numerous infantry battalions, and several artillery batteries, culminating in a total strength estimated at 20,000 men. This military structure reflected a conventional approach to warfare, bolstered by technological advancements that provided the British forces a significant edge over their Zulu counterparts.
Initial Advancements towards Ulundi
The advance toward Ulundi began slowly but gained momentum as the British forces approached the Zulu capital. Chelmsford’s strategy involved creating a supply line and establishing fortified positions, which, while essential for sustaining the campaign, also showcased his intent to engage the Zulus in direct confrontation. The anticipation of a decisive battle became palpable as the British forces steadily progressed toward their objective.
Zulu Preparations for Battle

King Cetshwayo’s Strategy
King Cetshwayo, aware of the rising tensions and the impending British assault, sought to bolster the Zulu defenses through careful strategizing and the mobilization of his available resources. His approach aimed to unite the fragmented Zulu regiments and inspire a collaborative resolve against the invading forces. Recognizing the challenges posed by British artillery and firepower, Cetshwayo and his commanders worked diligently to devise tactics that would optimize their strengths while compensating for their disadvantages.
Mobilization of Zulu Forces
The mobilization of Zulu forces involved drawing upon both experienced warriors and newly conscripted members from various clans. This process illustrated the Zulu’s commitment to preserving their sovereignty in the face of a formidable adversary. Coordinating a large-scale mobilization, however, presented significant logistical challenges; the Zulus faced issues of supply and organization, particularly in light of the rapid British advance towards Ulundi.
Condition of the Zulu Army
By the time of the battle, the condition of the Zulu army was mixed. While certain regiments were seasoned and battle-hardened, others were composed of inexperienced recruits lacking adequate training and resources. This variance in readiness contributed to potential fractures within the fighting force, challenging the Zulu’s ability to mount a cohesive and effective defense against the British assault.
Diplomatic Efforts

Zulu Attempts at Negotiation
In the lead-up to hostilities, Zulu leaders, including King Cetshwayo, endeavored to engage in diplomatic negotiations with the British. Delegates were sent to propose peace terms, reflecting a desire to avert bloodshed and retain autonomy. The offers made by the Zulu demonstrated a commitment to peace, provided that the British would consider favorable terms that recognized their sovereignty and territorial rights.
British Response to Peace Offerings
The British response to the Zulu peace offerings was marked by a dismissal of the proposed terms. Lord Chelmsford’s refusal to engage seriously with the Zulu envoys underscored a hardened colonial stance that prioritized military resolution over diplomatic negotiation. This lack of willingness paved the way for an escalation of hostilities, contributing to the atmosphere of inevitability that surrounded the onset of the battle.
Escalation towards War
As diplomatic avenues closed, both British and Zulu forces prepared for war. The standoff between the two nations intensified, exacerbated by mutual distrust and a series of military provocations. The Zulu’s efforts to negotiate were ultimately undermined by British ambitions and the perception that military action would yield more favorable results than diplomatic engagement.
Tactical Formations

British Military Tactics
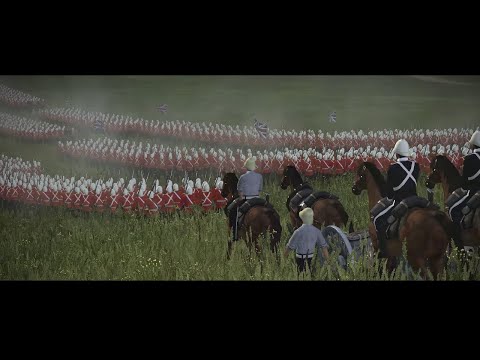
The British command prepared for the confrontation at Ulundi by developing tactics that emphasized the strengths of their weaponry and military organization. Chelmsford’s forces formed a hollow square, a defensive setup designed to maximize firepower and protect against Zulu charges. The British units implemented coordinated artillery support, aiming to create a formidable wall of fire that would decimate advancing Zulu forces before they could engage in close combat.
Zulu Battle Formation
In contrast, the Zulu army relied on traditional battle formations that emphasized swift and decisive flanking maneuvers. The Zulu’s approach typically aimed to close the distance rapidly, utilizing their agility and discipline to penetrate enemy lines. Despite being heavily outgunned, Cetshwayo’s forces planned to exploit their numbers and mobility to encircle and overwhelm the British squares.
Use of Terrain in Strategy
The terrain surrounding Ulundi presented both advantages and disadvantages for both forces. The British aimed to utilize the open landscape to their benefit, allowing their artillery to dominate engagements. Conversely, the Zulus sought to leverage the local topography to stage ambushes and traverse tactical positions quickly. This interplay of terrain and tactics would ultimately shape the unfolding dynamics of the battle.
The Battle Commences
Initial Exchanges of Fire
As the sun rose on July 4, hostilities commenced without delay. Initial exchanges of fire marked the beginning of the confrontation, with British artillery bombarding Zulu positions. The Zulu fighters responded with determined resolve, aiming to close the gap between themselves and the British ranks. The early stages of the battle set the tone for the ferocious conflict to unfold.
Zulu Charges and Tactics
With the initial bombardment subsiding, regiments of Zulu warriors launched coordinated charges against the British lines. Their tactics relied heavily on speed and cohesion, seeking to engage the enemy in hand-to-hand combat where their superior numbers could prove decisive. Despite their courageous and fervent assaults, the Zulus encountered significant resistance from the British firepower.
British Countermeasures
The British countermeasures proved pivotal in stifling Zulu advances. Artillery units maintained a relentless barrage, while riflemen unleashed controlled volleys against the charging Zulu. The deployment of Gatling guns further enhanced the British position. This combination of firepower created a devastating wall through which the Zulu would struggle to breach, contributing to a growing sense of despair within their ranks.
Turning Points of the Battle
Key Moments of Conflict
Throughout the battle, several key moments emerged that turned the tide in favor of the British forces. One such moment occurred when a focused artillery barrage deterred a crucial Zulu charge, shattering the morale of the advancing warriors. As the assaults faltered, British forces seized the opportunity to unleash devastating counterattacks, inflicting substantial casualties on the denser Zulu formations.
Impact of British Firepower
British firepower proved to be a decisive element in the conflict. The concentrated volleys from thousands of riflemen, coupled with artillery fire, resulted in severe losses for Zulu forces. The effectiveness of Gatling guns, which were still relatively new to combat, devastated Zulu ranks as they attempted to maneuver. This technological advantage became increasingly apparent throughout the battle, contributing to the erosion of Zulu morale and fighting capability.
Zulu Army’s Changing Morale
As the battle progressed, the Zulu army’s morale began to wane under the weight of casualties and the relentless British barrage. Initial confidence gradually shifted to despair, particularly as heavy losses mounted. The cohesion that had characterized the Zulu forces began to unravel, leading to disorganized retreats and diminished resolve in the face of overwhelming British firepower.
Consequences and Aftermath
Casualties of War
The Battle of Ulundi concluded with a catastrophic toll on Zulu forces, with estimates suggesting nearly 500 Zulu warriors killed and over 1,000 wounded. In contrast, British casualties were relatively light, with ten soldiers killed and around 87 wounded. This disparity illustrated the effectiveness of British tactics and weaponry, reinforcing a pattern of colonial military superiority.
Immediate Aftermath of the Battle
In the immediate aftermath of Ulundi, the British solidified their hold over Zululand. Following the victory, British forces captured and destroyed the royal kraal of oNdini, symbolizing the dismantling of Zulu authority. Moreover, the capture of King Cetshwayo marked a significant blow to Zulu leadership and autonomy, prompting a reevaluation of resistance across the region.
Long-term Effects on the Zulu Nation
The long-term implications of the Battle of Ulundi were profound. The defeat shattered the Zulu kingdom’s military prowess, shifting the balance of power irreversibly in favor of the British. This engagement set the stage for the eventual fall of indigenous governance and the establishment of pro-British leadership in Zululand. The cultural and social ramifications were felt for generations, with the Zulu nation grappling with both loss and the impacts of colonial rule.
Conclusion
Summary of Key Takeaways
In summation, the Battle of Ulundi epitomized the culmination of the Anglo-Zulu War, showcasing a dramatic clash of military forces and ideologies. Notably, the efficacy of British military tactics, combined with technological superiority, secured a decisive victory. The aftermath underscored the transition from indigenous sovereignty to colonial repression, leaving an indelible mark on South African history.
Reflection on Military Strategies
The contrasting military strategies employed by the British and Zulu forces provided critical insights into the dynamics of colonial warfare. The British reliance on disciplined formations, sustained artillery fire, and advanced technology starkly contrasted with the Zulu’s traditional engagement tactics. This engagement illustrates the broader theme of asymmetric warfare encountered in colonial settings, with technology often dictating the outcomes of conflict.
Enduring Impact on British-Zulu Relations
Ultimately, the Battle of Ulundi forged a legacy that would resonate in British-Zulu relations for decades to come. The suppression of the Zulu kingdom not only redefined power structures within South Africa but also influenced colonial policies towards indigenous populations across the continent. As such, the events of July 4, 1879, reverberate through history, serving as a reminder of the complexities and cruelties of colonial encounters.